Homemade Chicken Stock  |  Chicken Essence Recipe

Real Chicken Essence

There are some of you who would rather have the taste of real chicken goodness in their soup or dishes. As some say, NOTHING TASTES LIKE THE REAL THING. Today, we are going to make a homemade chicken stock that is just as marvelous that would make any soup or dish beaming with real chicken essence. Yes, chicken stock is simply the essence of chicken that are extracted from the chicken's flesh and bones through boiling process.  This chicken stock recipe is just so easy to prepare and make. What we only need are some chicken meat with bones and a couple or two of your leftover veggies in the refrigerator.


Now, let's start cooking.


Today's Special is Homemade Chicken Stock recipe

Recipe

Homemade Chicken Stock

Serving in cups

5 - 6

Prep Time

15 minutes

Cooking Time

35 - 40 minutes


Ingredients List label

Recipe Parts line divider
◻️ 3 pieces of chicken meat with bones, chopped in small pieces
◻️ 1/4 tsp. salt (optional)
◻️ 4 cloves of garlic, crushed 
◻️ 1 medium-sized onion, sliced 
◻️ 1 tsp. black pepper, whole
◻️ 1/4 cup carrots, peeled and sliced
◻️ 1 - 2 stalks of onion leeks, cut into smaller pieces
◻️ 1/2 cup pechay Baguio (Chinese cabbage), cut into smaller pieces 
◻️ 6 - 7 cups water

chicken meat with bones to make Homemade chicken stock
chicken bones with meat
ingredients to make Homemade chicken stock

ingredients to make Homemade chicken stock

Kitchen tools label

Recipe Parts line divider
◻️ chopping board
◻️ kitchen knife
◻️ stock pot
◻️ spatula
◻️ strainer
◻️ container with lid

Cooking Instruction label

Recipe Parts line divider
Prepare the water and chicken meat. Turn on the flame to medium high. Fill the stock pot with water. Drop in the chicken meat with bones.

Drop in the rest of the ingredients. Next, drop in the black pepper, garlic, onions, onion leeks, carrots and Chinese cabbage into the pot. You may season the broth with salt if you wish. Bring the broth to a boil.

ingredients to make Homemade chicken stock

Simmer the broth. Once boiling, lower the flame and simmer the broth for about 35 - 40 minutes. Turn off the stove. Set the broth aside and let it cool.  

homemade chicken stock broth

Remove the meat and veggie pieces. Once the broth has cooled, remove the chunks of meat and veggies and put in a small bowl. Using a strainer, transfer chicken stock into another container and cover it with lid. 
filtering homemade chicken stock into an airtight  container

5 Store chicken broth in container with lid. If you are not yet going to use the chicken broth,  store the container inside the refrigerator to prolong its shelf life. Best to label the container  with the date the broth / stock is made, so you'll know when it will get spoiled.
homemade real chicken stock

Cooking Pro Tips label

Recipe Parts line divider

🍵Chicken stock stored in a refrigerator should be consumed or used within 3 - 4 days. It is not advisable to use it beyond that period.

🍵To extend the shelf life of your homemade chicken stock, store it in an airtight container or heavy duty freezer bag and put it in the freezer. It will still be good to use within 4 – 6 months of storage.

end of recipe banner

For an authentic experience, we all want a dish that will capture and retain the essence of the meat in every sip or bite. Have you ever tried making a homemade chicken stock? I would love to know your thoughts. 


If you like today's special, you may share this recipe and follow me here on Blogger and Facebook for more free recipes to try and enjoy. 


Till next time!


Happy Cooking ! 


want to watch instead CTA banner
watch recap video here CTA image


sharing is caring CTA

Baked Tilapia with Tasty Side Dish of Tomatoes and Onions Recipe
Baked Tilapia with Onions and Tomatoes

Tilapia-Worth of Boodle Fight

Tilapia is one of the most cultured and commercially sought-after freshwater fish in the Philippines. It grows mainly in ponds, lakes and rivers. They are favored because of their high protein content, large size and palatability. There are many ways to cook tilapia and one healthy option is by baking it. 

Today, we are going to bake tilapia, partnered with a tasty side dish of onions and tomatoes. Know what? When I think of this dish, I think of Boodle Fight. Boodle fight is gaining grounds in the Philippines as a popular culinary experience of eating competition. It's simple to set up. Just put this dish on the table alongside with a bunch of rice and other viands, as well as your choices of sauces, sliced fruits and vegetables and that’s it. 

Fun Fact!

Did you know that tilapia fish farming can be traced back along the waters of the Nile River in ancient Egypt? It was said that the fish was of great importance to the ancient Egyptians that it was given a hieroglyph of its own! Isn't that cool?

Now, let's start baking.

Today's special is Baked Tilapia with side dish of Onions and Tomatoes

Recipe
Baked Tilapia with Onions and Tomatoes
Side Dish
Serving
6
Prep Time
30 minutes
Baking Time

1 hour


Ingredients List label

Recipe Parts line divider

For the TILAPIA MARINADE

◻️ 3 big pieces of Tilapia, cut and fillet into 6 pieces
◻️ 2 tbsp. salt
◻️ 2 tbsp. black pepper, ground
◻️ 2 tbsp. garlic powder
◻️ 2 tbsp. paprika powder
◻️ olive oil (for coating)

For the SIDE DISH

◻️ 8 - 9  medium-sized tomatoes, sliced thinly
◻️ 2 medium-sized red onions, sliced thinly
◻️ 1 1/2 tbsp. fish sauce (patis) 


Kitchen tools label

Recipe Parts line divider

◻️ chopping board
◻️ kitchen knife
◻️ mixing spoon
◻️ mixing bowl
◻️ baking trays (for the tilapia and side dish) 


tilapia marinade ingredients
Tilapia marinade

baked tilapia side dish ingredients
Side dish ingredients


Cooking Instruction label

Marinate the fish. Coat the sides each piece of tilapia with salt, black pepper, garlic powder and paprika. Set aside.

Tilapia marinade
Tilapia marinade

2  Deseed and julienne tomatoes into thin slice. Remove the seeds of the tomatoes and cut them into thin slices. Put tomato slices in a bowl.

deseeded and julienned tomatoes

3  Pour fish sauce or patis on the tomatoes. Mix the fish sauce and tomatoes together to incorporate the "umami flavor" of the patis. 

tomatoes with fish sauce (patis)
4  Cut the onions into half and julienne into thin slices. Once the onions are sliced, loosen the pieces to form into thin strips.

sliced onions
sliced onions
5  Prepare side dish for baking. Coat the baking tray with some olive oil. Pour the tomatoes and onions on the baking tray. Add some more patis if needed. Mix the mixture together and bake in the oven for 5 - 7 minutes at 230 degrees Celsius.

Onions and tomatoes side dish
onions and tomatoes side dish


6
  Prepare tilapia for baking. Grease the wire baking tray with olive oil. Coat both sides of each piece of tilapia with olive oil as well. Bake the side of tilapia with skin for 12 minutes and the other side for 10 minutes at 230 degrees Celsius.

preparing tilapia for baking

7  Arrange baked tilapia and side dish on a serving tray. Serve hot and enjoy

baked tilapia with side dish of onions and tomatoes


Cooking Pro Tips label

Recipe Parts line divider

👍 For added flavor, you may drizzle or brush the sauce of the onions and tomatoes side dish onto the baked fish.

end of recipe banner

As you may already know, tilapia is a versatile fish in which you can cook countless dishes. Have you ever tried baking this kind of fish? I would love to know your thoughts. 

If you like today's special, you may share this recipe and follow me here on Blogger and Facebook for more free recipes to try and enjoy. 


Till next time!


Happy Cooking ! 


Want to watch instead CTA banner
watch recap video here CTA banner


sharing is caring CTA

cocktail fruit salad recipe

An Irresistible kind of Fruit Salad

As summer approaches, eating a fruit salad is a sure way of fighting off the sometimes punishing summer heat. The Filipino version of this dessert is composed of mixed fruits that are combined together with the luxuriant creaminess of condensed milk and all-purpose cream. This is then frozen in the refrigerator and served chilled. As you know, there are so many benefits we can get from fruits. Every time you eat this dessert, you are just getting your healthy doses of essential vitamins, minerals and fibers that your body needs.

Fun Fact!

Did you know that the idea of mixing a variety of fruits with sweet syrup is a "western concept"? Fruit Salad became a hit in the American households during the mid-19th century. Usually, it's a dish composing of a variety of fruits served in a liquid of syrup or their own juice. It was back in the 1930s that fruit cocktail was marketed in cans. Some believe that the early known fruit cocktail was made of damaged or rejected fruit pieces that were diced neatly and offered as ready-made fresh fruits for fruit salad. There was also a time when people thought that the word "cocktail" in fruit salad meant that "booze" was bring added in the dish, just like with any other cocktail drink.

Now, let’s start mixing! 🥢

Today's special is fruit cocktail salad dessert

Recipe

Fruit Salad

Serving

15

Prep Time

18 minutes

Mixing and Chilling Time

4 hours and 15 minutes to 1 day


Ingredients List label

Recipe Parts line divider

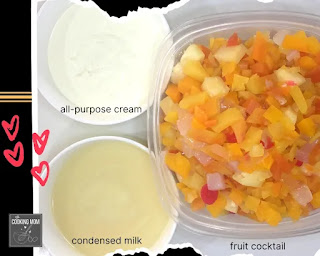
◻️ 1 can of 3.0 kg fruit cocktail (biggest can)
◻️ 2 cans/pouches of 250 ml all-purpose cream
◻️ 2 cans/pouches of 250 ml condensed milk

ingredients for cocktail fruit salad dessert


Kitchen tools label

Recipe Parts line divider

◻️ slotted ladle / coriander
◻️ soup ladle
◻️ mixing bowl
◻️ container with lid 


Cooking Instruction label

Recipe Parts line divider

1 Drain the cocktail fruits of juice using a coriander or slotted ladle. Drain the juice from the can and transfer contents in a separate container.

draining juice from fruit cocktail

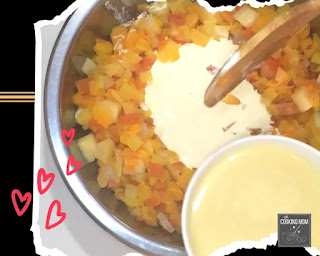
2 Get a bigger bowl or basin to mix all the ingredients. Pour in the cocktail fruits in the basin together with the condensed milk and all-purpose cream. 

condensed milk and all-purpose cream fruit salad mix

3 Mix all the ingredients together. Blend in all the ingredients in a large bowl and transfer content in a container with lid. 
 
fruit cocktail salad ingredients mixture
 
transfer of fruit cocktail salad dessert for chilling

4 Put the container in a freezer and freeze for at least 4 hours before serving. Serve chilled and enjoy. 

frozen fruit cocktail salad dessert


Cooking Pro Tips label

Recipe Parts line divider
👍  If you wish to downsize the serving, just buy a smaller can of fruit cocktail, 1 can/pouch of all-purpose cream and 1 can/pouch of condensed milk.

end of recipe banner

Truly, having a chilled dessert this coming summer is a welcoming treat. Have you ever tried making this kind of dessert? I would love to know your thoughts. 


If you like today's special, you may share this recipe and follow me here on Blogger and Facebook for more free recipes to try and enjoy. 


Till next time!


Happy Cooking ! 


want to watch instead CTA banner
watch recap video here CTA image


sharing is caring CTA

True Taste Buds Delight

Search This Blog

All visuals in this blog are taken within the four corners of our kitchen. The featured recipes here are meant to create dishes to which one can savor a touch of home in every bite.. Powered by Blogger.

Featured Post

Creamy Baked Macaroni with Basil Recipe

  Creamy Baked Macaroni with Meaty Basil Sauce Baked Macaroni is undoubtedly one of my family's comfort foods. It is so easy to prepare ...

Followers

Popular Posts